Accounting info. Accounting info 1s 8.3 accounting bank statement balances
In the process of work, in each organization, there is interaction with other companies (organizations). Payments must be made for outstanding goods, works, services, taxes and other payments. Currently, this process occurs through the Client-Bank system. This program is installed by bank employees on the computer of a company employee to make payments and load payment orders into the program in which accounting is carried out. Let's look at how bank statements are loaded into 1C.
Uploading statements from the Client-Bank program
In order to download an extract from the Client-Bank program, you must:
- Generate a statement for the required period;
- Export it to a text file to transfer data.
Export occurs when you click on the “Export”, “Export” or something similar button; in different Client-Bank programs this button is called differently. The generated file is uploaded for export to the desired folder, along a predetermined path.
In front of the tabular part of the document in the right corner we find the “More” button, click on it, a window appears with a list of functions, select the “Exchange with bank” item in it.

- The organization through which payment orders will be downloaded;
- Organization bank account.

Click “Download” at the bottom of the document and after that, in the tabular part, all bank statements will be loaded into the “1C: Accounting” program. After this, we review the report on the uploaded file and proceed to processing payment orders.
You can set up automatic processing of payment documents upon receipt and debit. To do this you need to configure.
You can select the “Setup with Client-Bank” document:
- By clicking the “Settings” button at the bottom of the “Exchange with the bank” document;

- In the “Bank Statements” journal, select the “Set up exchange with the bank” item from the list when you click on the “More” button.

In the settings, fill in the fields:
- We indicate the bank account from which statements will be downloaded;
- The name of the program is selected from the list provided by the developers - this is the program you are working with. After this, the fields “Upload file from 1C Accounting” and “Download file from 1C Accounting” open. “Upload file from 1C Accounting” only if outgoing payment orders are generated in the 1C database and then uploaded to Client-Bank;
The condition that must be met is the name of the download file in 1C, it must match the name of the download file from the Client-Bank program.
- At the bottom of the settings, two fields open, the left one shows upload data, and the right side shows download data.
In the “After loading automatically post” field, it is advisable to indicate two checkboxes on the positions “Receipt to the current account” and “Write off from the current account”, in this case payment orders will be automatically processed, which in the future only need to be double-checked without going into each of them.

After uploading payment orders, you should carefully check the “Type of transaction” and the created accounting entries, and make corrections if errors are found.
Uploading statements from a banking program into 1C is a very convenient procedure that significantly facilitates the work of the accounting department, significantly saving employees’ time.
Today we will look at how to correctly post a bank statement in 1C.
Now we will consider in more detail the issue of working with such a document as a 1C bank statement. As an example, let’s take a situation where you need to make a non-cash payment in accordance with a supply agreement.
For example, there is a certain company Pilot TD, which must pay the UkrPostachSbut company a certain amount. To reflect this action, you need to open the item in the “Bank” menu. There, select the “Outgoing payment order” section. The same procedure can be performed if you go to the control panel. There will be a bookmark of the same name, click on it.
You need to add a new entry in the payment order journal. The payment order must be completed in accordance with the requirements (depending on the specifics of the transfer), and then saved.


After this, you need to open a special category called “Bank Statement”. There, set the day on which the bank statement is directly saved.


Once you have set the date, you need to add another statement.

In the newly created statement, you must fill out the bank account, and also do not forget to put the date. A future bank statement in 1C will be generated for it.

If you have filled in all the required fields correctly, the functional panel will now be available to you. Find the “Select unpaid” tab on it.

A window will open in front of you, where you will need to check the required document (or several documents at once). When the checkboxes are checked, click on the “Check checked” button.

When completed, you need to close the form. Now you can see a statement in 1C, which is generated according to the required date.

There is another simple way to generate outgoing and incoming bank documents. They are formed directly from the extract form itself. This is easy to do, just click on the “+Add” button. And then in the same window you will be able to use 1C documents and:
- change the payment status of documents and much more.
navigate through all statements;
view the results of the conduct;

How to post a bank statement 1C 8.2 1C 8.3?
The procedure for making a bank statement in 1C version 8.2 is indeed slightly changed compared to 1C 7.7. But, if you think about it, the apparent inconvenience of the new algorithm is replaced by an understanding of its logic. We have already briefly covered working with a bank statement in one of our previous articles. This is the article “How to sell currency? Selling currency in 1s 82" |
Today we will look at the process of working with a bank statement in more depth. So, …
For example, we will reflect the process of payment by non-cash means under a supply agreement.
Let’s say the organization Dobro LLC pays a certain amount to the organization UkrPostachSbut. To reflect this action, open the “Bank” menu item and select the “outgoing” item. The same can be done in the control panel on the tab of the same name.

We add a new entry to the payment order journal. We prepare the outgoing payment order in an appropriate manner. Let's save it.


Then we add a new statement.

In the created statement, fill in the required bank account and the date for which the statement is generated.

After filling in all the details, a functional panel will automatically become available, on which you need to click “Select unpaid”.

In the selection window, mark the required document or several required documents with checkboxes and click “Send checked”.

After completion, close the form and the statement generated by the required number becomes visible.

To be fair, we need to add that we can also generate outgoing and incoming bank documents directly from the statement form. This is done simply by clicking the “+Add” button.
In the same statement window, you can navigate through statements, view the results of the transaction, change the payment status of documents, etc.

We hope that our article has sufficiently covered the answers to the questions: “ How to issue an outgoing payment order? How to make a payment? How to enter bank statements in 1C version 8.2? How to make a 1C bank statement? How to post a bank statement in 1C? How to post a bank statement in 1s 8? Bank statement 1C 82″
If you have any difficulties, we will definitely help.
You can discuss the operation and ask questions about it at.
If you have questions about the article or there are still unresolved problems, you can discuss them at
Rate this article:
How to set up loading of bank statements in 1C, as well as uploading, and how to make a statement in 1C 8.3?
Let's start by creating a payment order:
- Based on the document of receipt of goods and services, invoices, etc.;
- Through the creation of a new payment order/PP.
In the “Bank and cash desk – PP” block.
Fig.1
A journal with payments will appear in the window that opens, where you can, by setting up the appropriate selection, filter the necessary documents, for example, display a list by a specific organization, bank account, date or counterparty.

Fig.2
Filling out the main fields here begins with the “Type of operation”. Depending on what is selected, the structure of the document will change, as well as the required analytical fields.
Having filled out the basics, we open and close the document with the “Post and Close” button.

Fig.3
The payment system does not make any transactions in 1C 8.3; they are generated by “Write-off from account”, which can also be created based on the payment slip we generated, or manually, by creating a new write-off.
Creating a receipt/debit from a current account
The first option is to create it manually through the “Bank and cash desk – Bank statements” block.

Fig.4
The journal that appears shows all receipts and debits from the account. To make it more convenient to work with it, you can set filters:

Fig.5
To make the document we need, click on “Receipt” or “Write-off”, depending on what we need.
Fig.6
Here we fill out the main fields in the same way as filling out a payment order:

Fig.7
After filling out all the fields, check the correctness of the filled in details and click “Record-Post”.
In the documents “Receipt to the current account” and “Write off from the current account” we look at the transactions and check the correctness of their display through the “DtKt” button. The transactions will be displayed in the “Document Movements” window that opens.

Fig.8
After checking the correctness of the transactions, click “Post and close”.
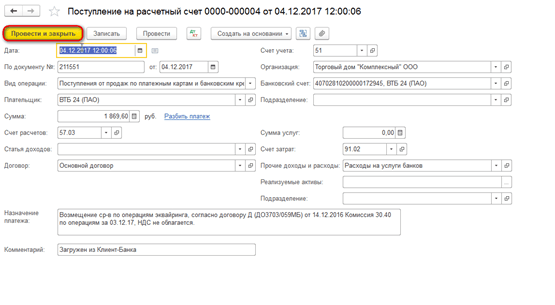
Fig.9
The second way to create “Receipt to current account” and “Write off from current account” by uploading a bank statement
Let's move on to sending documents to the bank. While in the “Bank Statements” journal, click “MORE—Exchange with the bank.”

Fig.10
In the “Exchange with Bank” window that opens, to upload documents to the client bank, select the “Send to Bank” tab:
- We select the company from which we will upload documents;
- We indicate the bank account;
- We select the period for which we need to download the bank statement;
- Select the location to upload the file.

Fig.11
The tabular part here will be filled with bills that need to be paid.
Next to each payment card that we want to pay, we put a “Flag” and click on the “Upload” button. This will open the “Check for virus attacks” window, where we click “Check”.

Fig.12
A file will be generated in the “1c_to_kl.txt” format, which must be uploaded to the client bank.
In the “Exchange with Bank” window, you can view a report on uploaded payment documents, for which click “Upload Report”. The resulting report will display the payments that were uploaded to a file for downloading to the “client bank”. It can be saved in any format or printed.
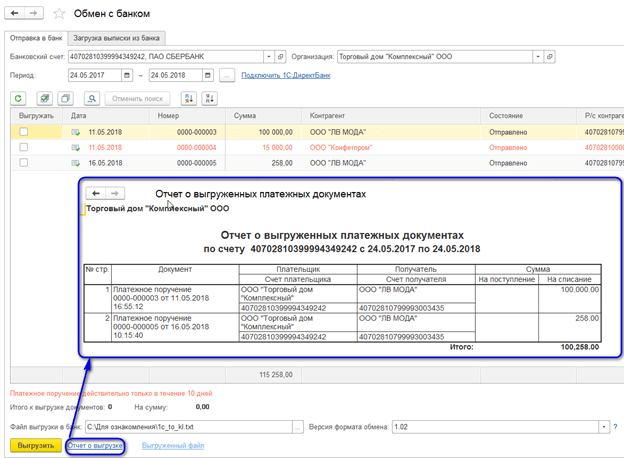
Fig.13
Loading an extract in 1C 8.3
The first option is from the “Download bank statement” tab.

Fig.14
We indicate:
- Organization
- Bank account
- Download file
Click on the “Update from statement” button.
The tabular part will be filled with data from the file, while the lines highlighted in red mean that the program did not find in the directories the data (registration account, counterparty by matching TIN and checkpoint) to which receipts or write-offs from the account should be distributed. Correctly distributed documents are highlighted in black.
Next to each document that we want to upload, we put a “Flag”. At the bottom of the window, information will be given on the number of documents to be loaded, as well as “Total Receipts/Debits for the amount”. Click “Download”.

Fig.15
If the bank statement in 1C 8.3 was partially downloaded, the system will display this information in the tabular part of the “Exchange with Bank” window. Documents that have not been downloaded will be displayed with the value “Not downloaded” in the “Document” column; for downloaded documents, the information “Debit from the current account or Receipt to the current account”, the number and date assigned to it will be displayed.

Fig.16
You can view a report on downloaded documents. To do this, click on the “Download Report” button.

Fig.17
Let's consider the second option, how to load statements into 1C 8.3.
In the “Bank Statements” journal, click “Download”.

Fig.18
Here we look for the extract download file and click “Open”.

Fig.19
The program will automatically download and post documents from the statement and display the number of downloaded documents, as well as the total receipt amount and the total write-off amount.

Fig.20
Documents in the Bank Statement journal, marked with a green flag, are posted and posted.

Fig.21
You will need to post and post the statement yourself if it is not marked with a green checkmark: open the document that has not been posted, fill in the basic required fields for posting the document, check the correctness of the filled in details, click on the “Post” button, then “Post and close”.

Fig.22
The document was processed and distributed.
If in the bank statement journal you need to display the initial balances at the beginning and end of the day, as well as the total receipts and write-offs for a given date, click “MORE – Show/Hide totals”.

Fig.23
At the bottom of the journal, the initial balances at the beginning and end of the day will be displayed, as well as the total receipts and write-offs as of the date.
Entering bank statements in the 1C 8.3 Accounting 3.0 program is carried out:
- Manual entry of bank statements;
Data on receipts and debits of funds in 1C 8.3 is entered in the Bank Statements journal. The magazine is located in the Bank and Cash Department section:
To manually enter an extract into the program, you need to click on the button in the journal form. Admission or book. Write-off.
There is another way to enter bank statements manually: based on other documents. Then the receipt and write-off data are filled in automatically according to the documents - grounds.
- : drawn up on the basis of an Invoice to the buyer, Payment request, Cash issuance, Sales (act, invoice) and other documents.
- WITHDene scripturehard means: drawn up on the basis of the documents Invoice from the supplier, Receipt (act, invoice), etc.
According to the received bank statements on cash flows, the accountant enters information into the 1C program:

Receipt to the current account in 1C 8.3
To enter data on cash receipts into the 1C 8.3 program, click book Admission and select the correct Operation Type in the document. The set of available form details depends on this.
To arrange for the buyer to pay for the order on account of the future delivery of goods, select the type of operation - Payment by buyer. We indicate the organization – Trading House “Complex”. If there is only one organization in the database, then the organization field is not shown in the form. This field becomes visible only if there are several organizations in the database.
The field Bank account of the organization, Amount, Payer, Accounts for accounting of settlements and advances – 62.01 and 62.02 is required to be filled in:

Since payment is made before the goods are sold to the buyer, the 1C 8.3 transactions will reflect the prepayment on advance payment account 62.02:

Debiting from a current account in 1C 8.3
Debiting from a current account in 1C 8.3 Accounting 3.0 is executed according to the book. Write-off from the Bank Statements journal. A document form opens, in which the type of operation and organization are indicated.
Let's select the transaction type: Payment to supplier. Let's fill in the data on the counterparty, amount, and bank account of the organization.
We also fill out the tabular part of the document: agreement, VAT rate, purpose of payment:

In this case, the following transactions are generated in 1C 8.3:

Uploading statements from Client Bank in 1C 8.3
The work of the accounting department is structured in such a way that during the day the accountant must prepare payment orders to the bank for current transactions and post the received bank statements for transactions already performed by the bank. Work in 1C 8.3 on interaction with the bank comes down to processing payment orders outgoing to the bank in the program and then entering data on transactions performed by the bank.
Automation of this process involves loading bank statements from the Client Bank into the 1C program and uploading payment orders from the 1C program to the Client Bank.
Currently, most banks support the data exchange format with 1C programs. Loading of bank statements after setting up an exchange with the bank is done from the Journal of Bank Statements according to the book. Download. You can open the Exchange with Bank setup form directly from the Bank Statements journal - book. MORE – Exchange with the bank:

Setting up an exchange with a bank and downloading bank statements is discussed in detail in our other article: “.
According to the book Download Bank Client data is read by the 1C program and loaded into the Bank Statements journal:

When loading data, the 1C 8.3 program matches database objects with data from the loading file. The message that the object “not found” is issued:
- By counterparty, if neither the bank account specified in the download file nor the TIN is found;
- For the counterparty's account, if the account number is not found in the download file;
- According to the contract, if the owner of the contract and the required type of contract are not found in the 1C database;
- If there are several identical objects in the database, the first one from the list will be selected and a warning will be issued regarding the situation;
- When re-uploading documents, the program analyzes only the Amount and Payment Type data. If they change, the data is overwritten.
How to upload a payment card from 1C 8.3 to the Bank Client
You can upload payments from the 1C 8.3 program to the Client Bank:
- From the Exchange with Bank processing form. If you place the processing in "The Chosen Ones"", it will be accessible from any place where the user works;
- From the list of Payment orders according to the book. Unload. When you press the button. Unload The Exchange with bank form opens.
We discussed in detail setting up an exchange with a bank for uploading payment orders from 1C to Client Bank in our other article: “”.
According to the book Unload from the Payment Order Journal, the data is downloaded into a text file and then transferred to the Client Bank:

Exchange form with the bank – Upload to bank tab:

You can study the features of processing banking transactions in 1C 8.3: accounting accounts, documents, postings, bank-client, and correctly configure Direct Bank settings on our. For more information about the course, watch our video:
On the website you can see our other free articles and materials on configurations: